WELCOME TO OUR BLOG

JOIN US AS WE SHARE THE EXPERIENCES AND RECIPES OF OUR ALL-SEASON ORGANIC GARDENING ADVENTURES AND OTHER RELATED STUFF AS WE DIG, WEED, HARVEST, AND COOK OUR WAY THROUGH EACH GLORIOUS GARDEN YEAR!

Sunday, February 20, 2011

Post and Beam Class at the Shelter Institute


The following is taken from notes and photographs collected during the week of 13 - 18 February 2011. True, it's a little afar from our usual topic of gardening, but we consider this a part of our homesteading adventure. Learning to construct your own buildings is an enriching experience that, having done it, we highly recommend.   

And finally the moment has arrived! We’d been looking forward to doing the 5-day Purely Post and Beam class at The Shelter Institute in Woolwich, Maine for a solid year and a half, talking about it at least once a week, and fully prepared for it to be a life-changing event. Ensconced at the Holiday Inn in Bath, Maine, we’re rarin' ta go. 
In the classroom
On Sunday evening our class of 21 students are treated to a presentation of what-to-expect, and Monday morning finds us in the classroom. If we didn’t learn it in high school we are now: how to draft. With pencil, triangle, rulers and drawing board we each draw a plan view, then a gable elevation of the 24’ square building that we will be framing. Drawing the posts, beams and braces gives us a preliminary understanding of how the structure will go together.
Drawing the plans
Monday afternoon we relocate to the workshop- a large, scantily heated building. Winter has been cold lately, and we now appreciate the value of wearing clothing in layers.

Using a Japanese hand saw
We get right at it by learning to use a Japanese hand saw to cut through 8x8” and larger Eastern White Pine timbers. The timbers had already been cut to shape and planed at the sawmill, reducing our labor considerably. Sawing, at first is tricky because the teeth are large and the saw easily jumps out of the groove. Very soon throughout the room one can hear blocks of wood falling to the floor.   
After  a few practice cuts we saw the timbers to the lengths needed for our building. Then, with two people assigned to a timber, we mark with pencil and framing square to show exactly where to cut out areas for various types of joins- dovetail, lapped, mortise and tenon, carefully following a diagram for each post.
Sharpening a chisel
On the second day we sharpen our chisels. This turns out to be more of a job than we had figured on. It takes the entire morning. The chisel is set into a holder to keep it at the right angle. Using stones that were soaked in a bucket of water, we start with the coarse one, proceed to the medium, and finally put on a chrome-like finish with the finest. When finished, the chisels are razor sharp and will shave hair which you can try out on your arm if you like.
Using chisel and mallet
Back from lunch we get to try out our chisels. Gil and I are assigned to the post that will be at the center of the building. Gil is shaping a tenon at the end of the timber. My job is to cut out four rectangular mortises, each of them 8-1/2 x 2” by 3-1/2” deep that braces will fit into. There is a technique to the process and once we get going with our mallets and chisels the job moves right along. The chiseled areas are refined by using a handy tool called a slick, a Japanese tool that is razor sharp like the chisels. As we go, we check for straight sides using a combination square.  
A really cool tool that someone brought
Finished for the day we set our sharpening stones under the wood stove for safe keeping. 
On day three we are noticing that it’s a week of hard work no doubt about it. We continue to chip away. We have moved on to the rafters and are forming a lap joint at one end. We measure, score, make three saw cuts, chisel, and finish with a slick. 
After a full day in the shop we get together in the classroom and are treated to pizza and a two hour lecture on how to do the mathematical formulas to know if a beam is in line with building codes. We calculate beam load strength at the various surfaces to be sure we are using adequate timbers. Our 8'x10' beams are fine for supporting the live and dead loads that will be impacting them.
Oiling
It’s now Thursday morning and we are finishing up with chiseling. We then measure and remeasure everything. One by one the finished timbers are machine planed, and then coated with a natural citrus oil, and end grains painted with wax. This keeps the timbers from twisting while they dry.

Waxing ends

This afternoon we tour several timber framed homes and barns. There are some fabulous examples including a three story barn with a cupola, a passive solar home, and a home with ceramic tile flooring and a lap pool. This gets many us to thinking about the designs of our future homes.

Barn with cupola

Barn interior

Window detail of a home

Detail of framing

A 20 x 30' home

Kitchen detail

Friday is the big day. We put our building together. This takes the labor of all of us, with come-alongs, sledge hammer, and a forklift.

It takes ten people to carry a beam

Pulling pieces together with a come-along

Raising the second bent

Hauling up a joist

Joining the 3rd bent to the second

Adding the top plate
We are finished at noon and heading home. It's been a fabulous week- hard work in a chilly space but worth every second of it. We met some wonderful people and made some new friends. Many thanks to the Hennin family- Pat, Gaius, Ethan, and Blueberry for offering this very unique experience! -G.H. and jmm 


Sunday, February 13, 2011

The Garden Notebook

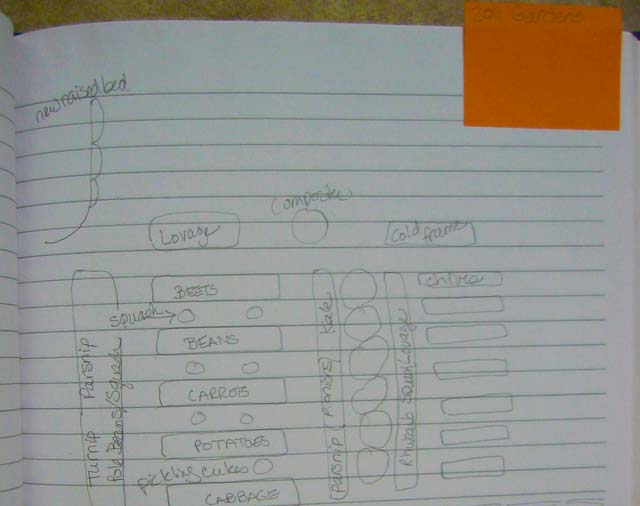
From one year to the next there are things to keep track of in the garden. We do this by keeping a notebook. Ours is a bound hard cover one so the pages stay in. Using a notebook, we find, keeps it all together. It's an ideal organization tool for us. 

This time of year we are pouring over garden catalogs and deciding what to grow in the coming season. So we choose a couple of facing blank pages and sketch out the shapes of the gardens. Then we write in what will go where. A sticky note is marked with the year and stuck on at the top. This keeps the place so we can go right to it as needed. 

Each new garden season moves forward in the book. This system keeps our previous year's data so we can look back to see how things were earlier. Ours goes back ten years and it's fun to look back to see how things have come along.
The system keeps our rotation planting in order. It's easy to see where things were last year. This year we simply move each veggie one row along. Beets last year, potatoes this year. 
The orchard areas are permanently located in the book unless drastic changes are made and the page is redrawn. Usually we just add in the new apple, or peach, or pear. 
The notebook also serves as a scrapbook; clippings and planting info are rubber cemented in. When we buy a fruit tree for instance, a snippet of the invoice that says what we bought and when is pasted in. We paste in handouts and notes from lectures and gardening workshops. All of the necessary data is then in one place instead of getting lost in piles of clutter and junk mail (oh, we're REALLY not THAT messy!). 
When it comes time to plant, the notebook goes right out to the garden with us, so seeds get put into their designated rows, and trees into their alloted places. 
Its a great little system, and when we are not using it, it takes up only the space of a book on the bookshelf. -jmm

Sunday, January 23, 2011

It's Time to Dream

Me and Gil have these wonderful dinnertime conversations, just the two of us. Lately we've been sizing up the garden once again (we do this every year). The ground is frozen and covered in snow and it’s a perfect time to reflect and do some planning. These conversations may have gotten a little predictable but we still find them way more enjoyable than politics, the weather, and the usual gossip.   

As we eat our home-grown produce we talk about whether we grew enough of our favorites. And it goes like this (I’ll let you guess who says what): “Wow, this winter squash is great. Let’s keep growing this kind.” (The winter squash by the way has exchanged starches for sugar, is mega sweet and wow is it good. Our dog loves it too- she can’t get enough of it). “At the rate we’re eating these beets we’ll run out next month. More next year?” “Absolutely!” “If you’re gonna put green beans in everything we’ll run out of ‘em.” “Yeah, maybe we need an extra row of those, and I wish we had put in a row of brussels sprouts.” “Let’s make sure to do those, some variety would be nice.”    
We also talk about how the garden year went. Did we get what we wanted out of the space we have? Actually, it was an excellent growing year for many, not just us. Since it went pretty good, we say stuff like, “geez i hope it will be as good next year! “Should we do some soil improving anyway?” “Yeah, might be a good idea just in case. Get some more manure around?” “Sure, and do we need any soil tests?” 
Invariably we get around to the idea of expanding garden space, something we’ve done almost every year so far. And the conversations go like this: “No, let’s not make the gardens any bigger. Don’t need the extra work”. “What work?” “What do you mean, ‘what work’?” “Well, what is there? We got the planting, the harvesting, and not much in between.” “Well, there’s manure and compost spreading.” “That’s no biggie.” “Ok, so let’s make a couple extra beds.” 
Feeding into these discussions are the plant and seed catalogs that have been arriving. They have the timing right, those companies. Seducing us in the middle of winter with gorgeous pictures and luscious descriptions, oh-h-h-h, gosh. They do have it right, you know. They couldn’t have gotten us at a better time. “Do YOU remember planting that pear tree last spring?” “WHAT pear tree?” “The one you planted, dear....And do you remember planting seeds in the middle of black fly season?” “I did WHAT?” Yea-a-a-a-h, they got it right. We have our catalogs and we are dreaming and it is as good as winter squash in January. -jmm

Beef and Vegetable Soup/Stew

Serves 4
Here is a very simple winter recipe that we like to make using veggies from root cellar or freezer, and organic grass-fed beef from farmer Mike a couple towns over in Lyman. We use a soup bone for this, and the butcher leaves plenty of meat on. If your soup bone is not meaty, add a pound or so of stew meat. 
Somehow, some Burgundy wine from California snuck itself into the pot even though we aspire to the hundred mile diet. But we have good intentions having started some Marechal Foch grapevines for wine making. 
The stock for our soups is made from vegetable scraps, mushroom stems, chicken bones or whatever else is handy. Collect such trimmings in a container in the freezer and cook them into a broth when there are enough. Add a couple of chopped garlic cloves while cooking, and some salt and pepper.

Jalepeno pepper adds a wonderful zip to winter cooking. Ours were picked from the garden and then sewn onto a long string and have been drying in the kitchen window, ready to pluck off the string and use at any time. 
This recipe is full of good things and sometimes comes out more like a stew than soup.  You can thicken it if you like with a flour and water roux. Also feel free to add other vegetables such as peas, corn, or whatever you have on hand. Along with a green salad freshly picked from the cold frames, it is a complete meal. It is also wonderful with freshly baked corn bread.  
Beef soup bone
4 quarts of stock 
1 medium onion coarsely chopped
5 garlic cloves, peeled and left whole
2 large carrots cut into 1/2” diagonal slices
2 medium potatoes cut into 1” cubes
2 cups of green beans 
1 Jalepeno pepper finely diced (include the seeds if you like it little hotter)
1 cup of Burgundy wine
Salt & pepper to taste
Put the stock into a cast iron dutch oven and bring to a boil. Add the soup bone and simmer for an hour. Add the onion, garlic, carrots and potatoes. Simmer another hour. Add the green beans, jalepeno pepper and wine. Season with salt and pepper to taste. Simmer for a half hour. Remove the bone, cut the meat into chunks and add it to the pot, then discard the bone (“here, Rover!”). Add roux to thicken if desired. Serve. -G.H.  

Wednesday, December 29, 2010

Our Hundred Mile Winter Diet

The hundred mile diet, as Barbara Kingsolver eloquently wrote about in her book, “Animal, Vegetable, Miracle,”  involves eating foods that are grown within a hundred miles from home. Growing your own veggies or buying them from local farmer's markets, raising chickens for meat and eggs, or getting fruits, raw milk and organic meats from local orchards and farms are ways to live the hundred mile diet.
Eating local vegetables is easy during summer as we harvest from our gardens and visit farmer’s markets. But it’s January and here in Maine the gardening season is long gone. So, what is the answer to eating local vegetables? 
Well, we’re doing it and here’s how. Our cold frames are filled with fresh greens. Hardy plants such as spinach, arugula, mache, claytonia and some lettuce varieties are beautiful and thriving even though the ground is frozen and there’s a foot of fresh snow everywhere else. We’ve talked a lot about cold frames (see previous postings) and right now is when we appreciate them most. Those fresh greens become salads and side dishes full of color, nutrients, and flavor.
Winter squash did very well in the recent growing season, and we put away several dozen delicata, acorn and butternut. Brined cabbage fills the sauerkraut crock, and we have jars of brined cucumber pickles. Cucumbers, zucchini, plums, and tomatoes in various relishes and chutneys are in jars in the root cellar. In the freezer are green beans, beets, swiss chard, collard greens, red mustard leaves, and basil. We have jars of dried pinto and kidney beans. Kale remains in the garden, we push the snow aside to pick some. Kale is sweet this time of year, its starches having gone to sugar with the chilly weather. 
Our other needs are supplied locally. The freezer is filled with organic grass-fed beef from farmer Mike in Lyman (a couple towns over) who does his best to get us our quarter every year. From him, too, we get raw milk, raw butter, and chicken. Apples are still available from a nearby orchard. Fish, lobster, and clams harvested off the coast of Maine are another important part of our diet, available year round. 
The hundred mile diet is not a new health food fad. It goes as far back as people have settled on the land and had to survive using the resources around them. Our great-grandparents (your great-great grandparents if you are younger than us) lived this way. And it can still be done. Barbara Kingsolver’s family made a commitment to a solid year of eating locally. Refer to the book for their experiences. And ... consider trying the idea for yourself (hey, it’s working for us...)! -G.H.

Monday, November 22, 2010

The Keyhole Garden

The Permaculture Series - exploring the concepts of sustainability: gardening that takes care of itself with less work and better productivity, one topic at at time.

One of permaculture’s many ideas is the “keyhole” garden, referring to the shape of it. One could instead call it “U” or horseshoe-shaped. A keyhole garden consists of a central pathway surrounded on three sides by garden beds. The shape is intended to maximize growing area while minimizing pathways.

We decided to try this idea. Our chosen space is about a 13 x 14 foot rectangle. We first took out some surfacing tree roots, and the movable rocks. The rocks are now a small stone wall behind the area, building up the back of it that had been a downhill slope. This leveled the area and will help to keep rainwater there. Rain is our source of water for this. It is out of reach of the hose. And, too, another concept of permaculture (there are many!) is of finding ways to retain and use rainwater, and we'll get to that in a future post.

After preparing the space we then figured out on which side the path should enter and how wide to make the path (wide enough, we decided, to turn a wheelbarrow around). The next step was to create garden-able soil by layering compostable materials. Our other garden areas were also started with compost instead of digging. The materials are built upward from ground level instead of digging downward (there’s too many rocks here to dig). This works beautifully- our plants have done very well in it.

We began with forest land for our keyhole garden, but if you have lawn instead, the same idea works just as well. We’re giving the layering process below in case you’d like to try it too.

We're not sure yet exactly what we want to plant. We want to try some of the plants touted by permaculturalists. These include Good King Henry, fennel, perennial kale, seakale, and other edible perennials. We'll think about this through the winter as we go through seed and plant catalogs. The "perma" part of permaculture means permanent, indicating the use of perennial or reseeding annuals that are hardy in our climate.

Here is how to assemble the layers, and I should say there’s no need to be a perfectionist about it. If you’re starting with lawn, cut the grass as short as you can get it.

1. Spread any soil amendments that are needed to improve your garden soil. Here, we need lime to convert forestland, and we like to add alfalfa pellets (this is sold as bunny food at the farm supply).

2. Top the amendments with a sprinkling of manure.

3. Next is a crucial layer: newspapers and/or cardboard. Use the black and white newspaper pages, not the shiny ads. Layer them 1 - 2” thick and overlap the edges. If you are shading out lawn be sure to make the layer thick to prevent any sunlight getting through. This layer and the ones beneath it will attract worms which will eat through the papers and cardboard. Worm manure is excellent for your plants.

4. Now add about a foot of mulch material. This is an important layer that will break down into a hefty amount of compost. We are using pine boughs from some pine trees we just had taken down, and some raked leaves. Scrounge for what you need for this layer- trimmings from shrubbery, grass clippings, raked leaves and so on, or go to the farm supply and get bales of straw (not hay which can reseed the area with grass).

5. Top it off with a layer of compost. You can sprinkle on some dirt also if you have some handy.

The layers will break down into compost. The keyhole garden will not require tilling or digging. The ground beneath the layers will loosen and become enriched by compost and worm activity (if you have sod it will rot and loosen up). Although we are told you can go ahead and put plants into this right away (plant them with compost surrounding the roots), we prefer to let ours age over the winter. In spring we’ll let you know what we’ve decided to plant in it. -jmm

Saturday, November 13, 2010

Greens for Winter Harvest

Earlier we posted instructions for building and preparing cold frames. This post will focus on the plants that we will be harvesting this winter. Our cold frames consist of eleven windows this year and planting took place between late August and late September. Between November and March there is little actual growth that takes place. It's starting to get cold enough at night now to be putting the windows down on the cold frames. This is a sign that growth is slowing for the season.

Spinach happily thriving in the cold frame in November
Under some of the windows are carrots, beet greens, and scallions that will over-winter and be ready in early spring. Between the rows of carrots, mache is already being picked for salads. Mache is the hardiest of greens and is one of our favorites. It is a small, low-growing plant that easily reseeds itself if you allow it to flower and go to seed. You may find that it has planted itself in the pathway outside of the cold frame.
We plant spinach also, and several varieties of lettuce. Black Seeded Simpson is a favorite lettuce because it is very prolific. The current crop will take us into January when the cold frame will be reseeded for a March crop. 
We also plant arugula, endive, escarole, Swiss chard, sorrel, and claytonia. Endive, escarole, and radicchio are members of the chicory family, with radicchio being an Italian red chicory. Arugula and sorrel add distinct flavors (sorrel is lemony) and are wonderful in a mesclum mix. Claytonia, also called “Miner’s lettuce,” sprouts small white flowers in the spring which we eat with the leaves. Spinach, beet greens, and Swiss chard should not be eaten raw on a regular basis, so we steam them for a side dish.    
We use succession planting for some of the crops. Mache, lettuce and spinach are planted in two week intervals so new crops become harvestable in late fall, the middle of winter and in early spring. 
These plants are our personal produce selection that keeps us from having to buy Peruvian produce at the super market. With a goal of eating locally, even in our Maine winter months, cold frames are how to eat from the garden year round. Bon appetite. -G.H.