WELCOME TO OUR BLOG

JOIN US AS WE SHARE THE EXPERIENCES AND RECIPES OF OUR ALL-SEASON ORGANIC GARDENING ADVENTURES AND OTHER RELATED STUFF AS WE DIG, WEED, HARVEST, AND COOK OUR WAY THROUGH EACH GLORIOUS GARDEN YEAR!

Thursday, October 24, 2013

Shelling Beans


It’s clean up time in the garden. Preparing beds for spring by working in compost, raking leaves into pathways, and collecting spent stalks into piles for next years’ compost are a part of the zen of the season. Communing with nature in the beautiful weather of early fall seems as productive to the psyche as gleaning the last of the produce is to the dinner table. Right now we’re harvesting the last of the purple pole beans.

They’ve served us well this year. It could be either that they grew well, or that we planted lots of them. These were grown from seeds saved from the year before, and there was a large envelope of them. Six tripods and six poles were each planted with three bean seeds per pole. The plants twined their way up the poles, with a few missing the poles entirely and meandering into squash vines from where each of them were found, untangled, and redirected.

The pole beans politely waited until the bush beans finished producing, and then almost suddenly began to appear in clusters. Many of the young beans were picked by handfuls, cooked, and eaten right away. Many others were blanched, and schlepped into the freezer.
Purple pole beans have white seeds
The last of the beans matured and then went ignored for awhile. We have now selected the best and largest of them, splitting open the pods to save seeds for next year. And, left were many, many more over-ripened beans on the vines. How easy it would be to pull up the plants and toss them onto a compost pile! But, why waste a good bean seed? So, we are preparing them as dried beans. After popping open the pods and spilling the seeds out onto pans, they are left to dry. The dried beans will be stored in glass jars.

Purple pole beans are fabulous as dried beans. To cook them, soak overnight along with a piece of kelp, then cook at a low simmer until softened. Enjoy them in chili as we have. Click here for Gil’s Fabulous Beer Garden Chili recipe. -G.H.

Wednesday, October 16, 2013

Yoga


I opened my eyes this morning. I waited to feel the stiffness in my shoulders, the ache in my back, the cramp in my legs. Not there!! Even after spending the day before as an amateur lumberjack. Lugged a chainsaw through the woods. Cut and hauled brush. Loaded logs onto a portable sawmill. Stacked the milled boards. Harvested fall produce from the garden. Hiked through the woods with the dog. After such a day, this sixty-some year old body could have expected some pain, cramps and stiffness. But, they weren't happening.
Murphy does yoga too
I blame this on yoga. Last night I spent 10 to 15 minutes doing a simple yoga routine. No medication. Just yoga and stretching. This morning I was ready to do it all again. Lumber milling and stacking. Turning compost piles. Gardening. And our dog Murphy will make sure we take our walks in the woods. Tonight I'll lay on the floor and stretch and twist. I'll sit and flex my legs. I'll get into the downward dog and the cat positions. I'll stand and crane my neck.

Tomorrow I'll wake up and look for the shoulder stiffness, the back pain and the leg cramps. But, I'll bet they won't be there. Thanks to yoga! -G.H.

Thursday, October 10, 2013

We are in the Newspaper!

Our local newspaper, the Waterboro Reporter, on 4 Oct., 2013 ran an article about our gardening and landscaping efforts. We are very impressed with the article and completely tickled to be written about. The newspaper has graciously allowed us to republish the article in its entirety here on our blog. Here it is:


Making use of the land
By Shelley Burbank

At first it was just a woman and some land. When Marsha Michler bought acreage on a wooded hillside 14 years ago, there was nothing there but forest. “I couldn’t find any signs of agriculture here,” she said, stepping across a hand-built cobblestone patio in front of her house. “I think it’s always been just forest.” Clearing a spot in the woods, she had a house built and worked on creating the patio out of stones she dug out of the land.

When Gil Harris joined Marsha a few years later, the two began to experiment with different types of gardens to see what would work best on the rocky, tree-covered soil. Judiciously cutting a few trees here and there allowed sunlight into the space. Michler and Harris began to slowly build up a variety of gardens–raised beds, horseshoe gardens, hugelkultur (soil on top of wood) gardens, traditional row gardens and cold-frame boxes. One huge, old pine log provided a perfect growing medium for strawberries and then cucumbers.

Due to their hard work, Michler and Harris are now able to eat year-round from food harvested just outside the kitchen door.

It didn’t happen overnight. “We worked at it a little at a time,” Michler said. “We moved things here and there.” The little-at-a-time approach produced some amazing results. Michler built 237 feet of stonewall just by excavating near a ledge in back of the house and forming the wall a few rocks at a time, day by day. She plans on continuing it down the length of the property. An asparagus bed that Gil dug the first year he moved in now produces delicious perennial veggies in the spring. Perennial chives, lovage, onions, wild garlic, sorrel and red mustard provide greens throughout the growing season, some self-seeding wherever they find a friendly spot.

There was a learning curve. “After spending all summer digging roots and rocks, I decided raised beds are the way to go,” Harris said with a laugh as he described the first summer he spent working on creating a vegetable garden area in back of the house. Instead of digging into the soil, now Michler and Harris experiment with different kinds of raised beds. Into these beds went squashes, beans, herbs, flowers, beets, and chard–just to name a few of the varieties.

There were also happy accidents along the way. When her house was built, Michler had a few trees cut. The logs and branches were piled up under some trees in front of the house. “It was hardwood,” Marsha said. “I didn’t have a saw. I didn’t have a stove to burn wood. So it stayed right there.” Instead of moving the wood, she began to fill in the spaces with leaves and compost. The three-foot high pile began to sink lower. She brought in some dirt to put on top and planted a mock orange shrub, a quince bush, and some shade-loving perennials.

Although the couple didn’t realize it, they were creating a hugelkultur garden bed. Hugelkultur is a gardening concept becoming more popular with people looking to create sustainable growing environments around their homes. Hugelkultur is the practice of creating raised garden beds out of rotting wood. As the wood breaks down, organic materials become available for the plants. The punky wood also helps retain rainwater, cutting down on the need for using additional water for the garden. Michler and Harris cover their piles of logs and branches with leaf litter, remnants of summer plants and table scraps. They top the mound with soil and organic manure from a local dairy farm, and into this bed of organic nutrients go the greens, vegetables and fruit plants.

The couple uses other garden concepts as well. One that stems from the permaculture movement–a sustainable environment design that attempts to mimic natural ecosystems–is the keyhole garden. These are shaped in a semi-circular design facing south to catch the sun all day. The keyhole–a pathway up the middle of the garden–allows for easy access to the plants. This design takes up less space and is more efficient at capturing the sunlight, ensuring more growing space and fewer walkways. Usually, larger plants go in the back, while the smaller plants are placed up front so everything can catch the maximum amount of sunshine.

Marsha’s and Gil’s keyhole garden was built on top of pine boughs and then layered with the compost and leaves and soil. It became a salad garden, with everything needed for a healthy salad in one handy space. Nearby, a large pine had been cut down because it was too close to the house. Marsha noticed that the double trunk formed a perfect frame for a new growing spot. “We put in huge amounts of dirt and manure. The branches rotted down really quick,” said Marsha, who planted strawberries in the log garden the first year. However, the chipmunks loved the fruit so much that the following year she decided to grow her cucumbers there.

The couple enjoys fresh greens throughout the winter by growing hardy plants in wooden cold-frame boxes. “We were inspired by Helen and Scott Nearing and by Eliot Coleman,” Gil said. The Nearings and Coleman are well known in sustainable-gardening circles for the many years they’ve been homesteading in Maine. The Nearings, some of the original “back-to-the-landers” in the 1960s, experimented with living off the land and wrote and lectured about their lifestyle. Coleman worked for them, homesteaded next door, and eventually developed some of the winter-gardening concepts that Harris and Michler are now using, including cold-frame gardening.

“Our first cold-frame was straw bales with a window over it,” said Harris. Michler added, “The straw attracted slugs, though.”

Because they were pleased with how well the hardy greens did over that first winter, the following year they built wooden cold-frames. This year Gil is experimenting with stapling sandpaper to the outside of the boxes to deter the slugs. Mache–a delicious dark green–will actually grow all year even in the coldest winter months. The arugula will grow in to the fall and then remain green for the picking. “That could go all winter,” said Gil. “We’ll also have lettuce until January.”

Just how much time does all this take? “It’s definitely part time,” said Marsha. Both Harris and Michler have sedentary jobs, and so getting out into the garden is a good respite, both physically and mentally. “Philosophically, I believe it is good to be self-sufficient,” said Harris. “We even enjoy shoveling snow. After a storm it’s usually a nice day.”

“It’s what I call immediate nutrition. If you can pick something and immediately eat it, it hasn’t been trucked, hasn’t been warehoused,” said Michler, who is a talented artist that works with fiber, jewelry, and quilting. She is a published author of craft books put out by Krause Publications. She also recently started self-publishing her books “because I love to do the whole thing, the layout, the cover art, the writing, the photography. With publishers, I had to let go of the layout, the cover, even the title. I love doing the whole process. I think it through that way.”

This holistic approach to her work jives with the couple’s holistic approach to their land. “We look at the ideas and see what we can use. We’re experimenting. We’ve begun to save a few seeds–squash, nasturtiums, beans,” said Harris. They have also begun a huge hugelkultur bed that will one day be grass for pasture for a horse and possibly their own beef and poultry. Already, the soil and branches have sprouted a green groundcover. “See how springy it is,” Marsha said, pressing on it with her foot. “This was all dug out, and when there was a heavy rain, it was a brook running down to the neighbors.” Now the area absorbs the water, and the area is well on its way into being integrated into the overall landscape design scheme.

The land nourishes the couple, and when there is abundance, the couple shares with the wider community by donating produce to the local food pantry. Marsha explained that the Cooperative Extension now has a program to log how much food is being donated into the food pantries through a voluntary program called Harvest for Hunger.

Marsha and Gil plan on continuing to shape their property and experiment with permaculture and other gardening techniques. In hopes of inspiring others, they blog about their experiences at http://theexistentialgardener.blogspot.com. To learn more about Marsha’s art and books, her website is http://www.jmarshamichler.com.

Monday, October 7, 2013

Spring Rolls


Right at the end of summer, after turning basketfuls of cucumbers into pickles, with many more snapped up by Gil’s work associates and a five pound bagful donated to our ASC cause click here for the story on that- a local food pantry, (many thanks to all of our giftees!), still a few more and a few more keep coming in on the vines albeit in a more gradual fashion than earlier. It’s great to have them. I thought of spring rolls. I love cucumber in spring rolls.


Spring rolls aren’t dependent on a cucumber harvest; they can be made at any time of the year out of ingredients you may have on hand. Made out of your own produce, they are light appetizers filled with flavors of the garden. And a great way to serve raw veggies. After enjoying them at our favorite Thai restaurant, as a treat preceding our favorite duck and veggie stir fry, a lovely dish with little baby ears of corn, we figured we could make some of our own.

Here is how to make spring rolls. Once you make them you will see how easy they are to prepare; if the process looks daunting in the photos it really isn’t. Adapt the fillings to what you have available. The list here consists of what we had at the time. Optional ingredients could include basil, arugula, other aromatic greens, and lettuce. Mix and match according to what your garden has to offer, and to your preferences.


To make the spring rolls shown here I used:
Cucumber, sliced thinly lengthwise
Giant red mustard, rolled lengthwise and sliced thinly
Perennial onion, thin-sliced lengthwise
Mint leaves, whole (they could be chopped)
Carrot, thin-sliced lengthwise

You will need:
Spring roll wrappers
Small quantity of thin bean or rice noodles, cooked according to package instructions
Dipping sauce (a recipe follows)


As you prepare the vegetables, arrange them onto a plate. Place warm water into a deep plate- a pie plate works well.


Soak one spring roll wrapper in the warm water, holding it under the water for about twenty seconds. Take it out of the water when the wrapper is softened, but not too wimpy to handle.


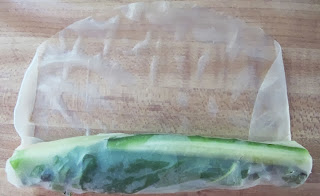
Place the soaked wrapper onto a clean surface such as a countertop. Place the following just below the center of the wrapper and up to about an inch of the ends: a thin line of the rice or bean noodles, then a thin line of each of the prepared veggies.


Fold the sides of the wrapper inwards over the fillings. Pick up the bottom edge of the wrapper, bring it up and around the fillings, and tuck it in under the fillings fitting the wrapper as snugly as possible.


Finish rolling the spring roll, then place it on a plate. Make more until you have a sufficient quantity.

With a sharp knife trim off the ends, then slice each roll to make four sections, placing them upright on a serving plate.

Place the dipping sauce into a small container. Spoon a small amount of dipping sauce over a roll before eating.

Light Savory Dipping Sauce
This recipe comes from Crescent Dragonwagon’s excellent cookbook, Passionate Vegetarian. Feel free to adapt ingredients to suit your tastes.

2 to 3 cloves garlic, minced
1/3 cup tamari or shoyu soy sauce
1/3 cup rice vinegar
1 tsp sugar
1/2 tsp minced peeled ginger
1/2 tsp toasted sesame oil
1/2 tsp srirache or other hot sauce (optional)

Combine all of the ingredients. Place into a small bowl for serving, and sprinkle with a small quantity of chopped peanuts. -jmm