WELCOME TO OUR BLOG

JOIN US AS WE SHARE THE EXPERIENCES AND RECIPES OF OUR ALL-SEASON ORGANIC GARDENING ADVENTURES AND OTHER RELATED STUFF AS WE DIG, WEED, HARVEST, AND COOK OUR WAY THROUGH EACH GLORIOUS GARDEN YEAR!

Tuesday, September 27, 2011

A Day at the Common Ground Fair


Imagine going to a fair where all of your major life topics are represented! The Green Party, women’s issues, solar and wind power, electric cars, low impact forestry, gardening, timber framing, farmers markets and food vendors selling organic, fresh and local, and more. Much, much more. And with lectures going on every hour making it hard to decide which ones to go to.
This year we picked four lectures to attend. The first was about using leaves to provide a resource of nutrients for the garden, followed by one on harvesting edible wild mushrooms, then an intro to beekeeping, and finally how to choose a fleece.
The first of these was both interesting and baffling. The lecturer had experimented with using leaves that he collects in large quantity, runs through a chipper and then piles in a covered bin to use as a garden fertilizer. He had also tried using them for nutrients in a pasture. He placed small piles of leaves throughout the pasture and found that this tended to boost the growth of surrounding plants, altho the leaves mulched out plants underneath. He is not using his pasture except to collect cut grass out of it to make vegan compost. Marsha kept wondering whether it would be easier to put a grass eating animal on the pasture to keep the grass trimmed and then use the manure for fertilizer.  
The mushroom speaker talked about several edible mushrooms commonly found in Maine and showed examples. Now we have a better idea of what to look for in our woods where we see a great many types. He stressed the importance of taking a knowledgeable person along or to use a good reference book.
The beekeeper gave us a good overview of raising bees, as much info as could be covered in an hour. Theres more to learn! We were interested in his take on beehive collapse disorder. He attributes this to monoculture, with the explanation that bees require enzymes from a number of plants, and gathering nectar from only one plant provides incomplete nutrition for them. It was an excellent talk and he will be a valuable resource when we are ready to set up a hive.
Marsha was very interested in learning about some of the common Maine sheep breeds. This included sticking our hands into bags of luxurious fibers, and comparing them for cleanliness, openness, the knitting value of sunburnt tips, excess lanolin, staple length, dual fibers, and what might be a good price. Marsha could not get out of there without two bags of Romney fleece in tow. While Marsha was exploring fleece, Gil dropped in on a lecture given by the Maine Farmland Trust about protecting farmland through easements. This is a topic that we have been researching. He also stopped into the Social & Political Action tent to visit the Green Party table and sign a petition for a cause we support.
Between lectures we caught part of a Border Collie demo in which the collies herded sheep, goats, and ducks. The dogs were very impressive. Went through some  crafts booths, wandered amongst apple trees full of apples, studied how well some living fences were growing, sampled Maine cheeses, looked at a rock garden full of dye plants and some other experimental gardens, lunched on organic lamb sausage with salsa topping, yum. It was a wonderful time and we’re already looking forward to next year’s fair. -jmm and G.H.




Monday, September 19, 2011

Using a Steam Canner


A pantry filled with colorful jars of delicious, homegrown foods is a gratifying finish to a summer of tending the garden. In the past I’ve made bread & butter pickles, jams, zucchini relish, basil beans, piccalilli, peach or plum chutney, and various tomato concoctions. They add zip and zing to sandwiches and dinners through long winters when I miss being out in the garden.
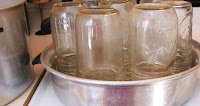
Jars are in the canner and waiting to be sterilized.
But as much as I love the results, putting up jars of food is not one of my favorite things to do. And I might not do it at all, except for having a steam canner. The hot water bath method was my first canning experience, consisting of babysitting a gigantic pot of water as it took a half hour to come to a boil not just once but twice for each batch of jars.
Then, about ten or so years ago I noticed a steam canner offered through gardening catalogs. The catalog entry implied it would be a more efficient method of canning. Intrigued, I put in my order, and haven’t looked back.
The first time I used the steam canner I was in love with the idea. It holds only a couple quarts of water, in comparison to four gallons used for hot water bath, so it comes to a boil quickly, getting the whole job done much, much quicker.
The jars have been filled with catsup
and are waiting for processing.
Except for water amounts, the two canning methods are basically the same. Either method can be used to process fruits, tomatoes, and pickled foods. Neither method, however, is for canning vegetables and meats. For those you need a pressure canner.
There are three parts to a steam canner. A pan at the bottom that is about three inches deep, a rack that fits in the pan, and a tall lid that fits over the pan. There are a couple of holes in the lid to vent steam. Seven quart jars, or eight pint jars will fit on the rack. Fewer jars work too, and if you have only one jar to process, that is fine too. This means that steam canning is adaptable to smaller harvests-  and with less water to boil, less energy is wasted.
I found on Wikipedia that steam is actually a gas, and it works by carrying the energy of the boiling water. I thought, too, about the cog train that runs on steam and full of passengers climbs Mt. Washington, the highest peak in the northeast. Steam cooks vegetables, heats New York, and powers trains. If it can do all of that, then it seems unquestionable that steam can seal jars of food.
This year I had a yen for a childhood favorite, Grandma’s chow chow, a corn relish. So I made some of that, and three batches of plum chutney since the plum tree did really well, and some tomato catsup. Yum. The pantry is looking well stocked, and winter will be delicious. -jmm

Monday, September 12, 2011

Plum Salsa


Stanley plums

We are having a great plum crop this year, the best our tree has ever done. The tree is about twelve years old, and in the past three or four years we’ve been getting enough plums to make a few things like cobblers, chutneys, and salsa. This year we’ve made plenty of those and even gave some plums to the neighbors. It always feels good to grow more than we can use. Our plums are Stanley, or prune plums, a little less sweet and much less watery than the bigger dessert types, making them ideal for using in recipes.  
Making plum salsa
Besides the abundance of plums, the colors of the garden inspired this salsa: deep purple plums, orange Habanero and bright red Cayenne peppers and green cilantro. This recipe is for a raw salsa. Because it is raw it’s not suitable for canning, but we’re going to try freezing some.  
Be sure to put on some latex or rubber gloves to chop up the peppers. Use a sharpened chef’s knife for the chopping. Fewer seeds go flying with a sharp knife, and a dull one tends to squish the peppers instead of cutting. Wash the knife and cutting board with hot water and soap when finished. 
Much of the heat of hot peppers is in the seeds and inner ribs. If you like serious heat leave them in. If not trim them out. If your taste buds are on the milder side, you can substitute sweet bell peppers.
Ingredients
4 cups of prune plums, pitted and diced (30 to 40 plums depending on size)
1 lime, juiced
2 avocados, peeled, pitted, and diced into 1/2” chunks
1 medium red onion, diced
1 Habanero or 2 Cayenne peppers, diced
1/2 cup cilantro, chopped
Pinch of sea salt
Freshly ground pepper to taste
Combine the ingredients in the same order given, stirring in each before adding the next. Use a potato masher to lightly mash the mixture- this helps to blend the flavors. Serve the salsa  with corn chips or on tacos. It is also excellent as a side dish or a topping with fish or chicken. -G.H.